

Teaching About Living and Nonliving Things
As an elementary school teacher, you’re laying the foundation for your students’ understanding of the world around them. Classifying everything around us as living and nonliving is one of the first concepts we teach in early elementary science because it is so fundamentally important. Many skills are used as students inquire about characteristics of living and nonliving things. Such as classification, naming attributes, etc.
By helping young learners grasp these concepts, you’re not only teaching them about biology but also fostering their observational and critical thinking skills. This guide will provide you with everything you need to teach K-2 students about living and nonliving things effectively, including interactive activities, lesson plans, and real-world examples.
What Are Living Things?
When teaching young students about living things, start by explaining the key characteristics that all living things share. Living things grow, need nutrients (like food and water), reproduce, and respond to their environment. These characteristics help students understand what sets living things apart from nonliving things.
Living Key Concepts to Teach
Growth
All living things grow and change over time. This growth can be observed in various ways, such as a seed sprouting into a plant, a caterpillar transforming into a butterfly, or a baby animal growing into an adult. Growth is a visible and measurable process that students can observe and record.
Teaching Tips
Use time-lapse videos of plant growth or animal development to visually demonstrate this concept. Involve students in growing plants from seeds in the classroom. Have them measure and record the growth of their plants regularly to track changes over time.
Activities
-
- Plant Growth Project: Provide each student with a seed to plant in a small pot. Have them water it regularly and observe its growth. Students can create growth charts to document the height and changes in the plant.
- Animal Life Cycle Charts: Use diagrams and pictures to illustrate the life cycle of various animals, such as frogs, butterflies, and birds. Discuss each stage of growth and what changes occur.
Nutrients
Living things need food and water to survive. Plants make their own food through photosynthesis, using sunlight, carbon dioxide, and water. Animals, on the other hand, consume plants or other animals to obtain the nutrients they need. This intake of nutrients is essential for growth, energy, and maintaining bodily functions.
Teaching Tips
Explain the concept of a food chain and how energy is transferred from one living thing to another. Use real-life examples and visual aids to show how plants and animals obtain their nutrients. Conduct simple experiments to demonstrate the importance of water and sunlight for plants.
Activities
- Photosynthesis Experiment: Place two identical plants in different conditions—one in sunlight and one in a dark area. Have students observe and record the differences in growth over time.
- Food Chain Activity: Create a classroom food chain using pictures of plants, herbivores, and carnivores. Discuss how each living thing depends on others for nutrients.
Reproduction
Living things reproduce, creating new organisms. This can be through seeds in plants or babies in animals. Reproduction ensures the continuation of species and can occur in various ways, such as sexual reproduction in animals and plants or asexual reproduction in some plants and microorganisms.
Teaching Tips
Use examples from both the plant and animal kingdoms to illustrate different methods of reproduction. Discuss the importance of reproduction for the survival of species. Use hands-on activities like planting seeds or studying the life cycles of animals to make the concept tangible.
Activities
- Seed Germination: Have students plant different types of seeds and observe the germination process. Discuss how seeds grow into new plants and the conditions necessary for germination.
- Animal Life Cycle Models: Use models or pictures to show the life cycle stages of different animals, such as egg, larva, pupa, and adult in butterflies. Discuss how each stage is crucial for reproduction.
Response to Environment
Living things react to their surroundings. Plants might grow toward light (phototropism), and animals may move away from danger or towards food and water. These responses are crucial for survival and can involve complex behaviors and adaptations.
Teaching Tips
Conduct experiments that show how plants and animals respond to changes in their environment. Discuss how these responses help living things survive. Use examples from nature, such as how animals migrate or how plants grow towards light, to illustrate these concepts.
Activities
- Light and Plants Experiment: Place a plant near a light source and observe how it grows towards the light. Rotate the plant periodically to show continuous adjustment.
- Behavioral Observation: Use videos or live observations to study how animals respond to environmental changes, such as birds migrating or animals seeking shelter during storms.
Non-living Key Concepts to Teach
What Are Nonliving Things?
Nonliving things are objects that do not possess the characteristics of life. They do not grow, need nutrients, reproduce, or respond to the environment in the same way living things do. Understanding these differences helps students classify objects correctly.
No Growth
Nonliving things do not grow or change biologically. While they might change physically through processes like erosion or rusting, these changes are not due to growth as seen in living organisms.
Teaching Tips
Use contrasting examples to show the difference between biological growth and physical change. For example, compare the growth of a plant with the weathering of a rock. Highlight that while both may change over time, only the plant is growing in a biological sense.
Activities
- Growth vs. Change Chart: Create a chart comparing examples of growth (plants, animals) with examples of physical change (rocks eroding, water freezing and melting). Discuss with students how these changes differ.
No Nutrients
Nonliving things do not require food or water. They do not have metabolic processes that require energy intake. This is a key differentiator from living organisms.
Teaching Tips
Highlight objects and discuss why they do not need nutrients. Use real-life examples to show that nonliving things remain unchanged without food or water, unlike living organisms that need them for survival.
Activities
- Nutrient Needs Discussion: Have students bring in objects from home and classify them as living or nonliving based on whether they need food or water. Discuss each item and its classification.
No Reproduction
Nonliving things do not reproduce. They cannot create new objects through biological processes. This is an essential characteristic that helps distinguish living things from nonliving.
Teaching Tips
Use examples like rocks, water, and man-made objects to explain this concept. Compare these with living organisms that reproduce either sexually or asexually.
Activities
- Reproduction Activity: Show pictures of living organisms with their offspring (e.g., animals with babies, plants with seeds) and contrast them with nonliving objects that do not produce offspring.
No Response to Environment
Nonliving things do not respond to environmental stimuli. They remain unaffected by changes in their surroundings in the same way that living organisms do.
Teaching Tips
Conduct experiments that show how living things react to their environment, such as plants growing towards light or animals moving towards food. Contrast these with nonliving things that do not exhibit such responses.
Activities
- Environmental Response Experiment: Place a plant near a light source and observe its growth towards the light. Compare this with a nonliving object, like a rock, which does not respond to the light.
Comparing Living and Nonliving Things
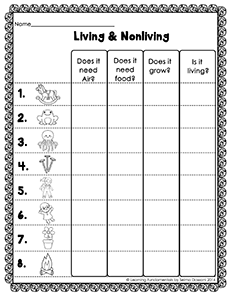
Understanding the differences between living and nonliving things is crucial for young learners. Interactive activities that involve hands-on learning can be particularly effective.
- Nature Walk: Take students on a nature walk to collect and observe various objects. Ask them to classify the objects as living or nonliving based on the characteristics they’ve learned.
- Classroom Chart: Create a chart with two columns labeled “Living” and “Nonliving.” As a class, list objects under each column. This visual aid helps reinforce the differences.
Once students have a chance to understand the characteristics of living and nonliving things. It is a perfect time to explore their environment in search of items to classify. You can go for a nature walk, keeping in mind the characteristics of living and nonliving things. It is a great time to strike up conversation for items that might be hard to classify.

You can set up various stations in your classroom. Included in my resource is a page where students will go through various old magazines and cut out items for each category. Another activity is comparing a living flower to a plastic flower using a venn diagram. I have also included a sort, an emergent reader and a writing activity.

Detailed Lesson Plans by Grade Level
Tailoring lessons to the developmental stage of your students ensures that they grasp the concepts effectively.
Kindergarten
In kindergarten, the primary focus in life science is to establish a basic understanding of living and nonliving things. Students will practice identifying and classifying objects into these categories, using simple sorting activities with pictures or objects. Classroom discussions will center around the basic characteristics that distinguish living things, such as the ability to grow, move, and respond to their surroundings.
Grade 1
Grade 1 introduces students to the fascinating world of life cycles and habitats. Hands-on activities, like planting seeds and observing their growth, will help students understand the needs of living things, such as water, light, and nutrients. Simple experiments will explore how plants react to changes in their environment, laying the groundwork for deeper exploration in later grades.
Grade 2
Grade 2 delves deeper into the needs of living things and the environments they inhabit. Students will engage in more complex projects, such as growing different types of plants and comparing their requirements for light, water, and soil. Observation of animal behavior, both in the classroom and through media, will spark discussions about adaptation and how animals survive in their unique habitats.
Teaching K-2 students about living and nonliving things is a vital part of their early science education. By using interactive and hands-on activities, you can make these concepts engaging and memorable. Remember to encourage curiosity and critical thinking, allowing your students to explore and ask questions about the world around them. Share your experiences and ideas with fellow educators to continue improving and innovating in the classroom.
Incorporating these lessons into your curriculum will not only help your students understand the basics of life science but also foster a lifelong love of learning and exploration. Happy teaching!


Leave A Comment